Non-advertised vacancies and direct offers
- Create and request approval for a non-advertised vacancy, this includes vacancies that are being advertised outside of Jobtrain for example Graduate Interns advertised on Careers Connect.
- Directly appoint a named candidate
1. Create a job
- Go to the Jobtrain link and enter your Username and Password and click Login.
- Click Add a job.
Create a new Job
- Click Create a new job
Once you have selected create a new job, the details tab will open. Here you will add all the information for the request.

2. Details tab
- Click Details tab.
- When creating a new job, complete all the information as required. All mandatory fields are highlighted in red.
- Do not auto populate fields, as this will enter incorrect information.
- Previous post holding occupant name (for backfill or replacement only) – please add in the name of the employee this vacancy is replacing or back filling
- Recruitment Team contact (for recruitment use only) Please do not add anything into this field as it is purely for the recruitment team
- Start date and Advert closing date Please do not enter anything into this field as it is for the recruitment team only. Once completed Click Save and Continue.

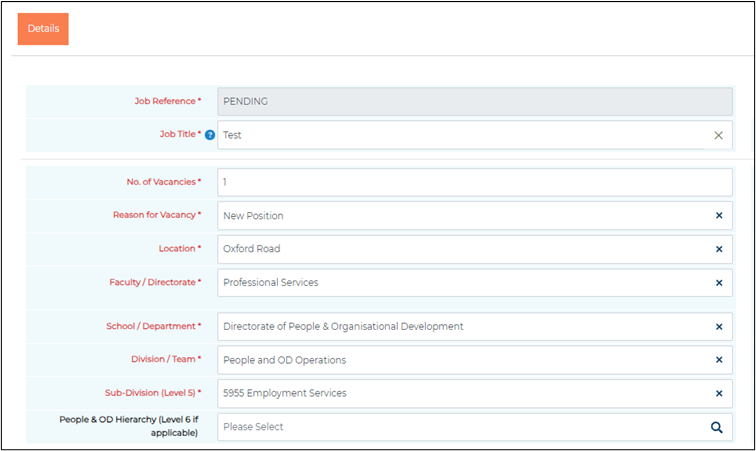
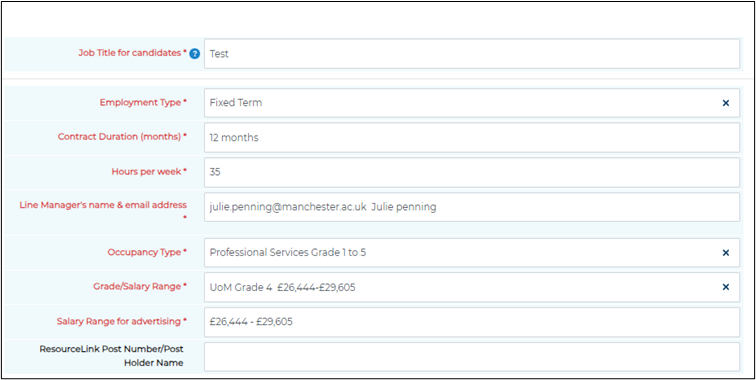
- Once the form has been fully completed, click Save and Continue.
- If the form is not fully complete and you have clicked Save and Close, you can return to editing the form by searching for the job.
Searching for a Job
- If you have saved the form and now need to complete it, open Jobtrain and click Search.
- Select Search Jobs.
- Select Draft under Job Status.
- This will now show you a list of all your jobs in draft. Click on the relevant job and continue to complete the Details tab.
- Complete any Job Notes before moving onto the Approval tab.

3. Adding Job Notes for Direct Named Appointments
Use this section for non-advertised roles where you have a direct named candidate.
- In the Note Subject field, add a title that describes the links or information you are sharing.
- In the Description field, paste links to the documents you want to share, including details of the candidate you wish to appoint or add your information.
- Please Note Job Notes, once added, can not be deleted.
Top tip: Before adding any documents, you will need to save them onto your OneDrive with ‘UoM Shared Access’ selected so you can copy and add the links to Jobtrain. Details on how to access and save information on OneDrive can be found here.
The information or documents you would be required to share are:
- Reason why the vacancy is not to be advertised.
- Name of the successful candidate
- Any links you are sharing, the documents you would be required to share are:
Project proposal (if necessary).
- You can add as many Job Notes as you wish, including any notes you wish your approver to be aware of.
4. Job Notes for vacancies advertised outside of Jobtrain
Use this section for non-advertised roles that have been advertised outside of Jobtrain. For example, Careers Connect for Interns.
- In the Note Subject field, add a title that describes the links or information you are sharing.
- In the Description field, paste links to the documents you want to share, including details of the candidate you wish to appoint or add your information.
- Please Note Job Notes, once added, can not be deleted.
Top tip: Before adding any documents, you will need to save them onto your OneDrive with ‘UoM Shared Access’ selected so you can copy and add the links to Jobtrain. Details on how to access and save information on OneDrive can be found here.
You need to add job notes for the following
- Reason why the vacancy is not to be advertised.
- Any links you are sharing.
- Once you have a successful candidate you can go back and add the name
- You can add as many Job Notes as you wish, including any notes you wish your approver to be aware of.

5. Approval Form
- Click Approval Form.
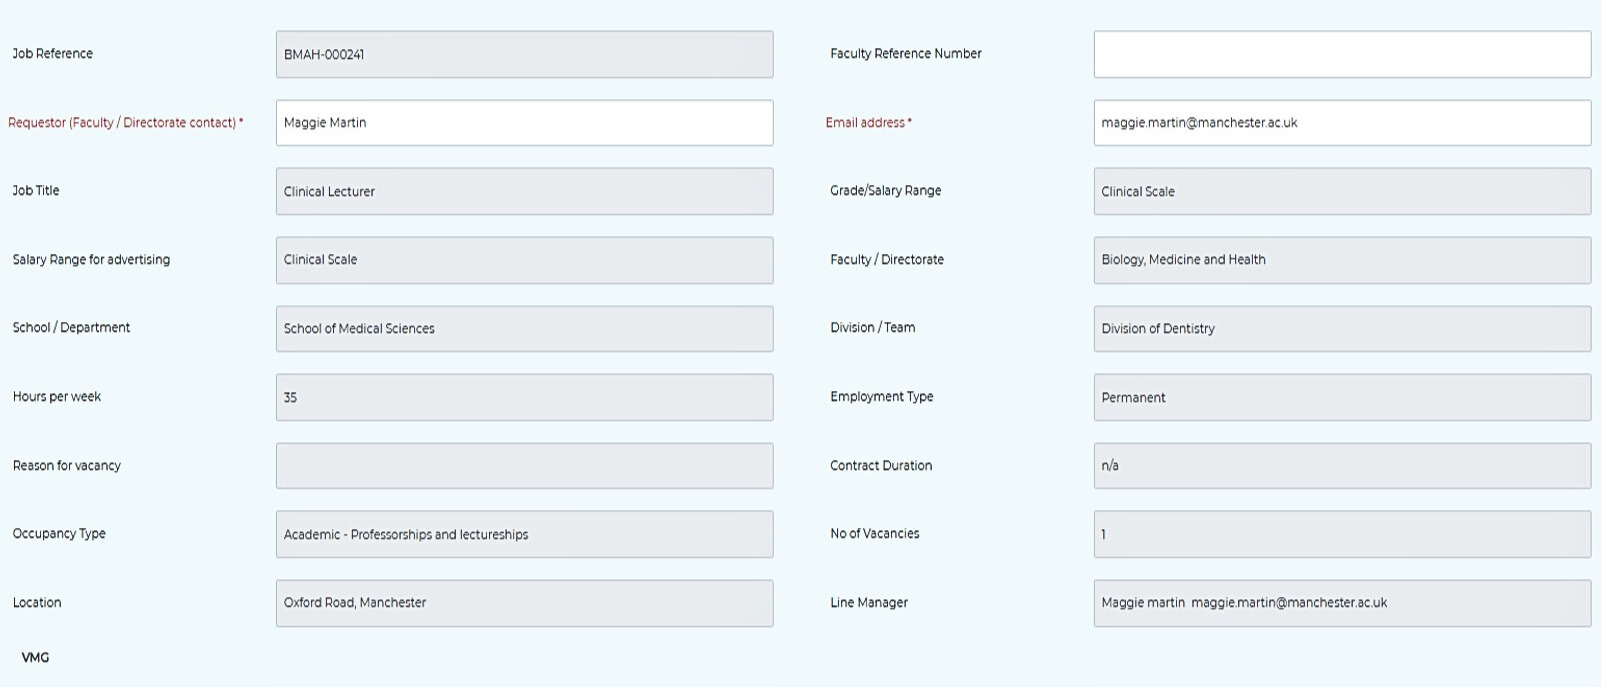
- This section populates the information added to the Details section. Enter all other required information (fields in red are mandatory).
- Faculty Reference Number is the unique number given by each school when they log the information prior to completing online approval.
- Requester (faculty/director contact) : Enter your name, the person completing this form.
- Email address: Enter your email address.
HERA code/Hay score
The vacancy must be evaluated via the HERA process before it can be advertised - this will give you the HERA code / Hay score to include in your approval request.
HERA does not apply for academic or research roles (except Technician, Experimental Officers and Computing/IT). In these cases, enter “N/A” in this field.

Select the type of funding from the drop-down menu.
- Match Funded – Where a project has internal match-funding. This indicates that a portion of the project costs will be funded by The University from internal funds in addition to external funding.
- Baseline – Fully costed and forecasted University/Faculty/School funding.
- Research/Project – Fixed-term or finite external funding.
Enter the Finance Funding Code and, where applicable, I&E Code and Task Code. If your post has an LD Recharge code, then you must check you have obtained approval from the NHS liaison Team (nhsliaison@manchester.ac.uk) for this funding. NHS Liaison have to complete a Trust Recharge Agreement (TRA) form and obtain signatures of approval which should be completed prior to advertising or appointment of posts.
If the code is split, please provide details of the percentage amount that should be charged to the Funding/Activity/Task. Please ensure your contract duration is covered and the percentages add up to 100% (see example image below).

Multiple Funding
Does the vacancy have multiple funding, using the drop-down box to select Yes or No. If it does, then you would need to obtain the approval of the other budget holder outside of Jobtrain. The approver can evidence this other approval within the comments box of the approval email.

If the funding must start & end on a certain date, this should be entered here. For example, a vacancy with a fixed term entered as 24 month, this might be an actual date that cannot change rather than 24 months from when the vacancy was filled.
The vacancy was advertised in Jan 2024, the funding is for as 24 months and the funding is to end 31/12/2025 The candidate did not start until 1/3/2024 however the end date should remain as 31/12/2025 when completing the starter form
Is the funding start/end date fixed or movable – using the drop-down box select the relevant option. If fixed, then end date can not change. If Movable, then the end date can be different on the candidate starter form if need be.
’Is the role to be advertised?’: Select No in the drop-down menu.

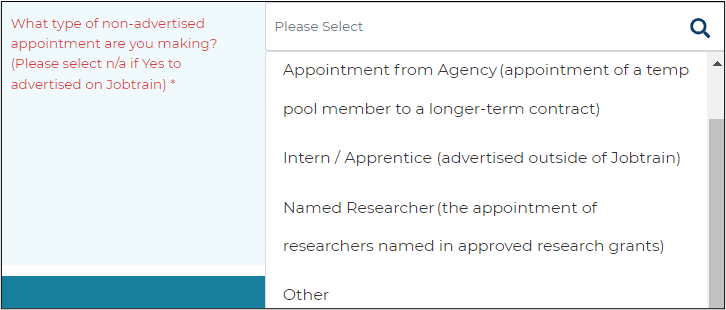
Select the reason why the vacancy is not to be advertised using the drop down.
Source of Hire
Tracking sources of hire helps to determine which recruiting strategies are most effective in attracting qualified candidates.
Please select from the drop down the type of source of hire from the following ( this relates to all types of advertised and non-advertised roles)
Follow Current Advertised/Non-Advertised process – The hiring manager will handle the recruitment process and Recruitment Operations will provide assistance as required. This option includes vacancies that are to be offered to candidates named on a research grant.
Talent Acquisition support – A Talent Acquisition business partner will take the lead in managing the recruitment process.
Agency support – An approved recruitment agency from the University’s Preferred Supplier List (PSL) will assist in sourcing candidates. A written justification in the job notes is required to explain the use of an agency.
Internal move – The candidate is already an employee within the University and is moving into a different role.
Other 3rd Party – Involves working with external programs or organizations to recruit candidates. Examples include partnerships with The Works, Job Centres, Apprenticeships, etc

6. Job Approval Workflow
- Select the relevant approval template from the Job Approval Workflow section drop-down menu.
- Select the relevant Job Approval Workflow.
- Once selected, the screen will refresh and a list of approvers will appear at the bottom of the screen under Mandatory Sign Off.
- If you have selected the wrong job approval workflow and your mandatory sign offs are incorrect, click Reset Approval and select the correct job approval workflow. If you have uploaded a job description, you will need to reupload.


7. Approval Attachment
- Upload the Job Description to the Approval Attachment section. Please ensure when uploading from your computer you give the job description a unique name, the system will not store documents with the same name.
- Click Save and Start Approval. This will start the job approval process immediately and you will receive a message onscreen advising the approval process has successfully started.
- The Job Reference field will now be updated with the next vacancy reference, this is the reference you will need to email to your candidate.
- Mandatory Sign Off will now show the form has been emailed to the first approver.
- Once approved, you will see the second approver email has been sent automatically and once the second approver has approved, you will see an email has automatically been sent to the third level for approval.
- Once the final approver (recruitment team) has ratified the form, you will receive an automatic email notification to advise the vacancy has been approved. As long as P&OD have received the completed candidate personal details information, they can commence the Offer process as per next step detailed in Section 8.


8. Vacancy raised in error or no longer required
If you raise a vacancy that is no longer required
In Job Notes add in the Note Subject - Not required
In description – Add the reason it is not required
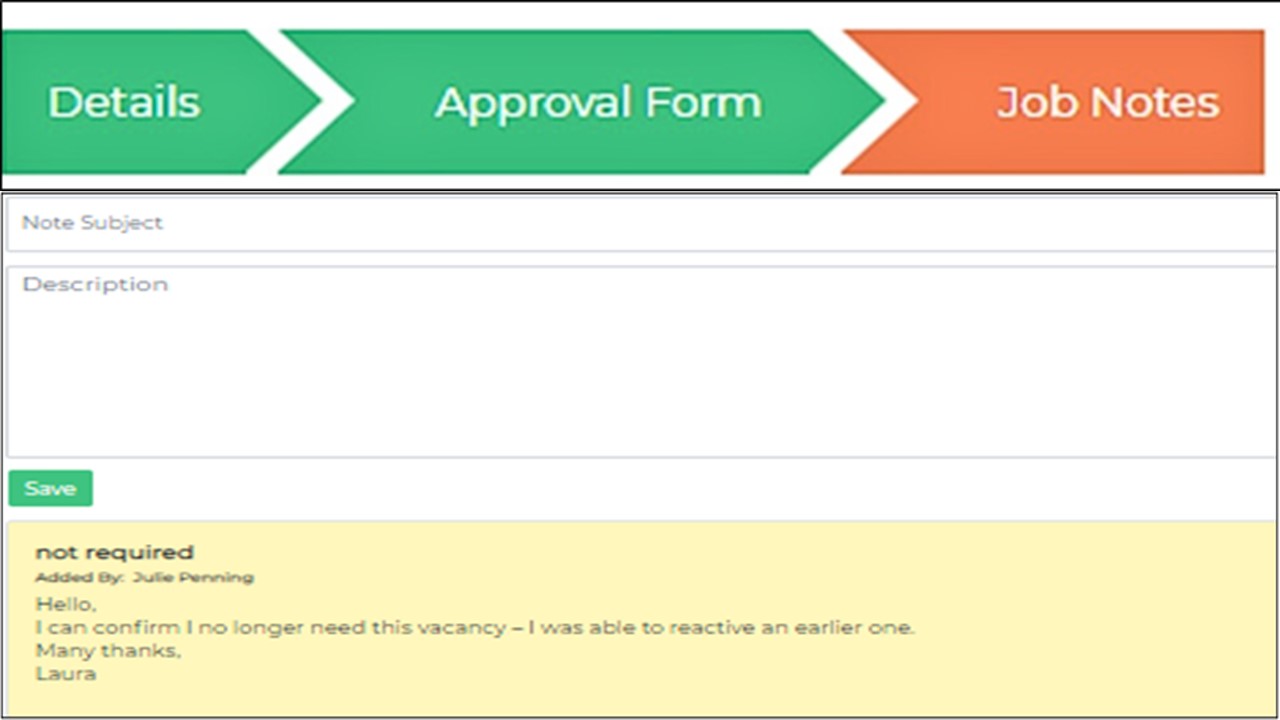
Press Save
Email the Recruitment team at people.recruitment@manchester.ac.uk to advise them that the vacancy is not required, ensuring you advise them of the correct vacancy reference number
9. Emailing the Candidate to provide their personal details
- Once you have submitted the vacancy for approval, Jobtrain will generate the Vacancy Reference Number.
- Email the candidate both the vacancy reference number for the job going through approval and the correct link to the Opportunity by invitation only post on the Jobs at the University of Manchester website, advising them to complete an application form to submit the personal details needed to process their offer paperwork.
- Once the candidate has successfully submitted their personal details, the Recruitment team will move the candidate to the correct vacancy on Jobtrain
- The job requester and hiring manager (if different) will receive an email notification that the starter form can now be completed and submitted for processing. Please note that the Offer cannot be processed until the vacancy is fully approved.
Link for External Candidates: https://www.jobs.manchester.ac.uk/Job/JobDetail?Jobid=24238 - or anyone who currently does not work for the University or works in an Atypical role such as Casual or Teaching Assistant Including all students
Link for Internal Candidates: https://www.jobs.manchester.ac.uk/internal/Job/JobDetail?Jobid=24238 - for anyone who is currently working at the University in a substantive role.
10. Status of Approval
- You can check the status of your request at any time by logging into Jobtrain and clicking Search Jobs.
- Add the Job Reference Number and click Search.
- Click Job Title.
- Click on the title of the job.
- Go into the Approvals tab and scroll to the bottom. Here, you will find the status of each approver. If you want to resend the request to approve - click Resend and the approval email request will be sent again.


