Interviews
- Set up interviews
- Send shortlisted candidate applications to panel members in preparation for interviews
Set up interviews
You can manually book interviews with candidates, then add those details to Jobtrain. Or you can set up self-service interviews in Jobtrain, where candidates can book their own time slots - this is helpful for colleagues managing large recruitment campaigns or a lot of recruitment activity.
Manual interviews:
1. Jobs Tab
Click the job you are interviewing for.
- You will see a list of candidates.
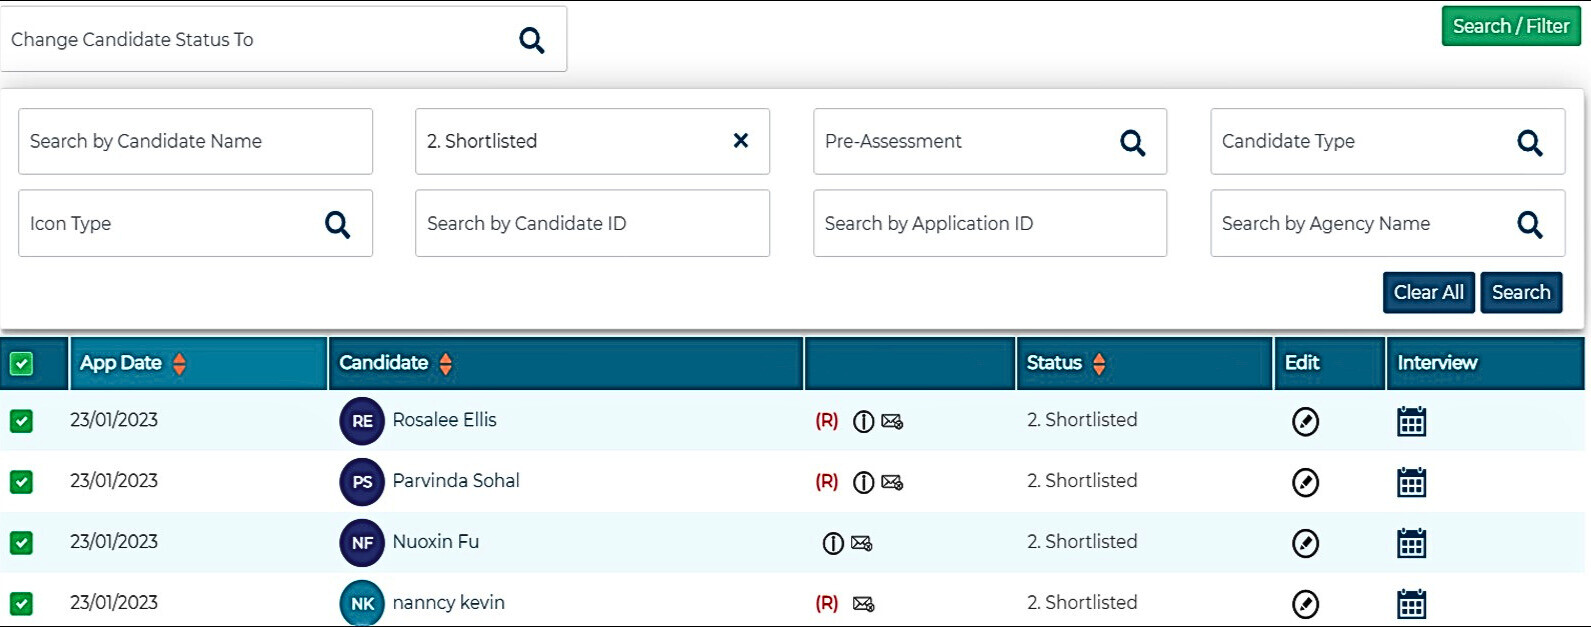
- You can use the Search & Filter box to search for all candidates who have the status Shortlisted, as this status will have been updated when you shortlisted.
- Click Search/Filter and change the Candidate Status to Shortlisted and click Search.
- Only candidates with that status are now visible.
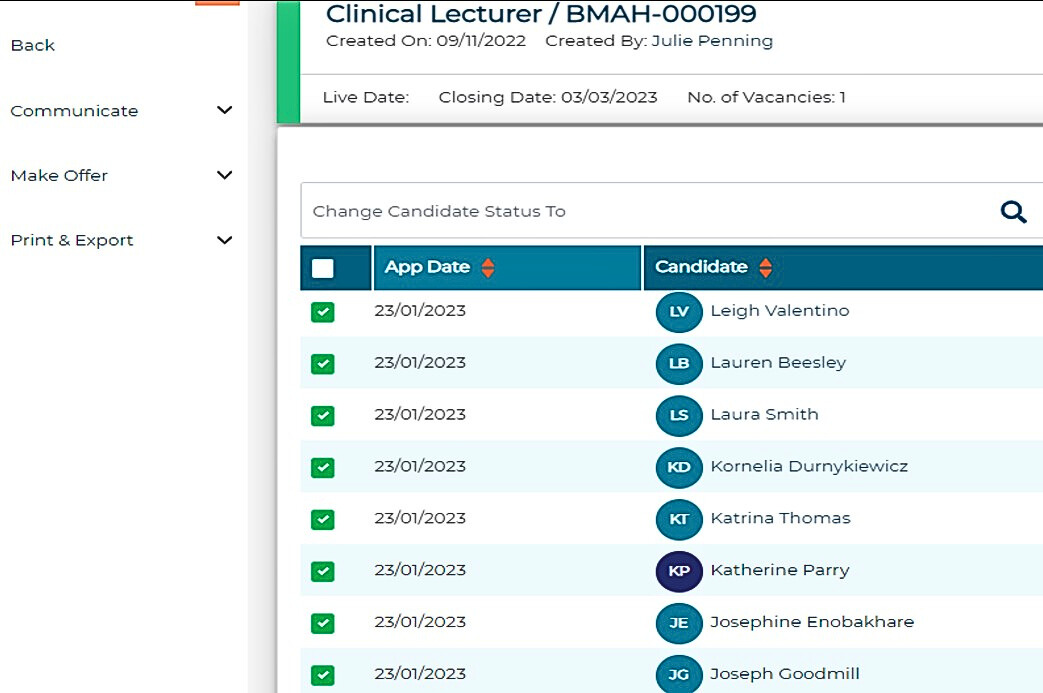
Top tip: When you select multiple candidates you must always remember to untick them.
- Locate the person you wish to create an interview slot for and click on the Calendar Icon.
- A new window will open for you to create the appointment.

2. Creating the appointment
- There are two options to choose from when creating an interview.
- Create, preview and amend the email invitation, and send to the candidate (go to section 3).
- Confirm and send the interview details outside of Jobtrain and simply update the Jobtrain status. This status should also be used for those candidates who have applied via an agency. You should notify the agency who will contact the candidate on your behalf with the confirmed interview time and date (go to section 4).
- Create, preview and amend the email invitation, and send to the candidate (go to section 3).
- When an interview is created and the interviewer receives notification in their Outlook, only the Vacancy reference number the interview relates to will show.
3. Previewing and amending the invitation before sending
Any email that is not automatically sent by Jobtrain can be edited before sending. This will not change the base email template – these can only be edited by superusers.
Top tip: Check first which candidates are Internal and External in the candidate list, to enable you to send one email per candidate type. There are different internal and external email templates, as colleagues that already work for the university will not need as much information as someone who works outside it. Or it may be that you want to offer expenses to external candidates but not internals.
- Click on the calendar icon of the candidate you wish to create an interview slot for.
- Click Create New Appointment
- Complete all the required fields. Candidate and Job Title fields will automatically populate.
Details Tab
Interview Date
Using the calendar icon select the date you have already confirmed with the candidate.
Interview Time
Using the drop-down box select the time of the Interview which you have already confirmed with the candidate. Please note the system uses the 24-hour Clock. If you require 5-minute break in between interviews remember to arrange your times accordingly with the candidates.
Interview Duration
Using the drop-down box select how long the interview will take for each Candidate. Eg. If the interview is 1 hour, select 01 using the first drop-down menu. If the interview is less than an hour, for example 45 minutes, use the second drop-down box and select 45.
Add Interviewer
Using the Search button, type in the name of the interviewer and select, to add another interviewer, type name in the search field and press to select. Continue to add all the names of the interviewers.
Email to Candidate
Toggle to Red
Email to Interviewer(s)
Toggle to Green. This will send the interviewers an email notification of the interview booking.
Arranging Teams interviews in Jobtrain
Currently this functionality is not available and the toggle to switch it on should remain as red. You can add a Teams invite and information into your emails to the candidates if you wish to arrange a Teams interview. We are currently investigating the possibility of offering this as additional functionality.
Email interview date & time (VCS):
Toggle to Green. This will add a calendar attachment to any invitation/notification emails selected.
Top tip: You need to toggle the emails off at this stage as you will create the email in the candidate list section, once you have created interview days/times for all candidates.
Email to interviewer(s): Select the email template Manual Interview booked
- Click Send invite. You must click this, as you have toggled Email to Candidate to Off this will not email out. This is to Save the information, prior to sending the email at the next stage.
- Click Exit.
- This will take you back into Calendar Entry – click Close at the bottom of the page.
- Please Note – you will need to scroll down the page to see this
- This will now take you back into the Candidate List and you can continue to go into each candidate and create interviews for all your shortlisted candidates.
- When all the interview slots for all candidates have been created, you now need to send out the email to invite the candidates.
- Check the type of candidate they are, External or Internal, by hovering over the icons next to their name.
- To send the emails in bulk, select all the candidates of the same type. Eg. all external candidates. Select all these candidates you have created interview times for and click Communicate.
- Next select all internal candidates and do the same.
Top Tip: Once you have selected a candidate and created a slot, you must untick the box next to their name.
- Click Send Email.
- A Compose an Email window will open and you will see who the emails are being sent to.
Select an email
Select the relevant email template
- Invitation to 1st Interview (with expenses) External Candidates
- Invitation to 1st interview (no expenses) for Internal Candidates
The email template will populate into the email text, and you can make any amendments here.
Email Subject
This will populate with Invitation to Interview – you can overtype this if you wish.
Email text
You will now see the email that will be sent to the candidate. The fields in {} are merge fields that will be activated when the email is sent and the yellow highlights are what you need to update to personalise your email with your own information regarding the interview; for example details of the day which could include a presentation or your email address if you wish the candidate to send you anything directly prior to the interview or confirm their attendance. The yellow highlights will not appear on the email to that the candidate receives.

If you want to add your email address or anything else as a hyperlink:
- Add your email address to the email
- Highlight the address and copy
- Click on the link Icon
- Click on Link type – select email
- Paste your email address in, click OK
You can also add any attachments at this stage. Such as a Pre-Interview Submission or Job Description. You can also click Preview to see the full body of the email.
Sending
Once you are happy with the email, click Send and the email will automatically be sent to all your selected candidates.
Status of candidates
Once all emails have been sent, you will need to change the status of the candidates, this can be done in bulk or individually.
- Tick the candidate’s box.
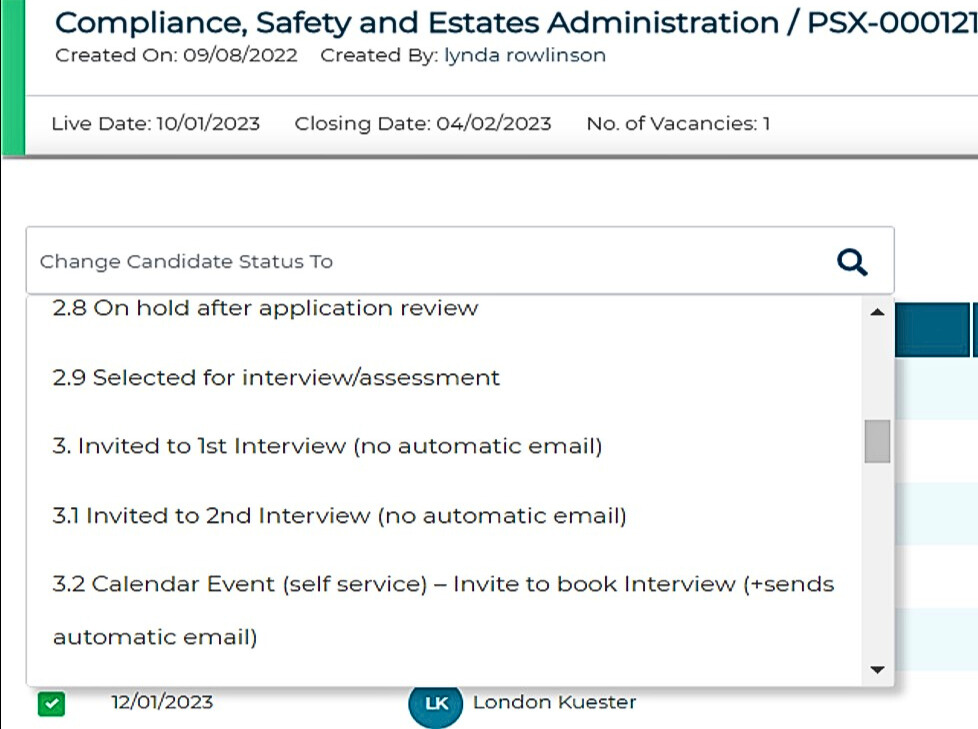
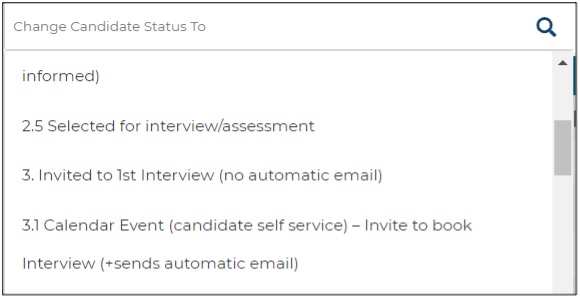
- Click Change Candidate Status to Invited to 1st interview (no automatic email)
- Click Save.
- Candidate Status has now updated.
4. Interview confirmed outside of Jobtrain
Top tip: This option should be used for candidates who have applied via an agency, and the agency is confirming the interview details.
- Once you have confirmed with your candidates the day and time of the interview and advised by email using outlook, you will need to update the statuses in Jobtrain.
- In the Candidate List, click on the candidate’s name and click the calendar icon
- Click Create New Appointment.
Details Tab
- This will now open the Details tab for you to complete the interview information. Add in the confirmed time and date of the interview.
- Toggle Email to Candidate and Email to Interviewer to red.
- Click Send Invite. You must click this even if you are not sending any email, this saves the information.
- Click Exit which will take you back to Create a new appointment.
- Click Close to go back to the lists of candidates.
- When you have created interview slots for all candidates, tick all the candidates you have created interview times for and click Change Candidate Status
- Change the status to Invited to 1st Interview (no automatic email).
- Click Save.
- The candidate status has now changed.
5. Cancelling an interview and rescheduling if required
From time to time, an interview needs to be cancelled either by the recruiting manager or the candidate.
- In the candidate list click on the Calendar icon.
- Click Create New Appointment.
- This will take you into the interview details you have already submitted.
- Click Cancel Interview
- A pop-up will appear asking ‘Do you want to cancel the interview?’ Click yes.
- Click Exit.
- You will go back into the Candidate List and can see the interview details have now been removed.
- If you have already confirmed this interview with the panel members, please make sure you let them know.
- If the interview is to be rescheduled, create a new appointment and add in the new times and day and follow the previous steps.

6. Changing Status: Candidate withdraws application
Should a candidate withdraw their application, you should update the Candidate Status.
Change status to Did not/declined to attend interview.

Self-Service Interviews
1. Creating self-service interview slots
Before you can invite your candidates to interview, you need to create a new event.
- Select the calendar icon on the top menu.
- On left hand side click New Event.
- You will be given the option to create either a brand-new calendar entry or copy an existing entry.
- Click Create a New Calendar Event – this will now open the details tab.

2. Details
Enter the details in all the fields.
Top tip: You must press Save on each Tab as you go along.
Event creator
This will automatically populate with the name of the user creating the event after you have completed the details page. Once you press save and continue at the end.
Event name
The title of your event. This is what the candidate will see when they are selecting their appointment eg, People Project Assistant – Job ref PSX-0001 – 1st Interview.
Event type
Select from dropdown the type of appointment the interview will be.
No of candidates per appointment
Allows you to define how many candidates can select each time slot created. (eg, for 1-to-1 interviews, type the number 1. For group interviews, type the number of candidates you plan to assess at the same time). Do not set up different appointments at the same time - the calendar event functionality can not facilitate this and candidates won’t be able to book.
Candidate self-service
You need to switch this toggle to green.
Which status should prompt the invite email?
This is the status that will trigger the email inviting candidates to log in and book their appointment.
This field will automatically auto populate to Calendar Event (candidate self-service) – Invite to book interview (sends automatic email).
Candidate status after booking
Select the status ‘Calendar Event (candidate self-service) Interview Booked (+sends automatic email)’. The candidate’s record will automatically update to this status once they have booked their slot and a confirmation email will be sent to them.
The following fields are optional sections that you can include in your calendar event.
Booking cut off restriction
Specify the number of days before the appointment candidates can book in. This includes weekends. This will mean attendees cannot be added after the cut-off date.
Link the event to all jobs at this location
Please leave this field blank if you are arranging interviews for a specific job. (Should only be used if you are arranging interviews across all jobs currently being advertised for a single location).
Assign to a campaign
This is not applicable for The University and should be left blank.
Enter all required information and click Save & Continue to move to the Jobs tab.
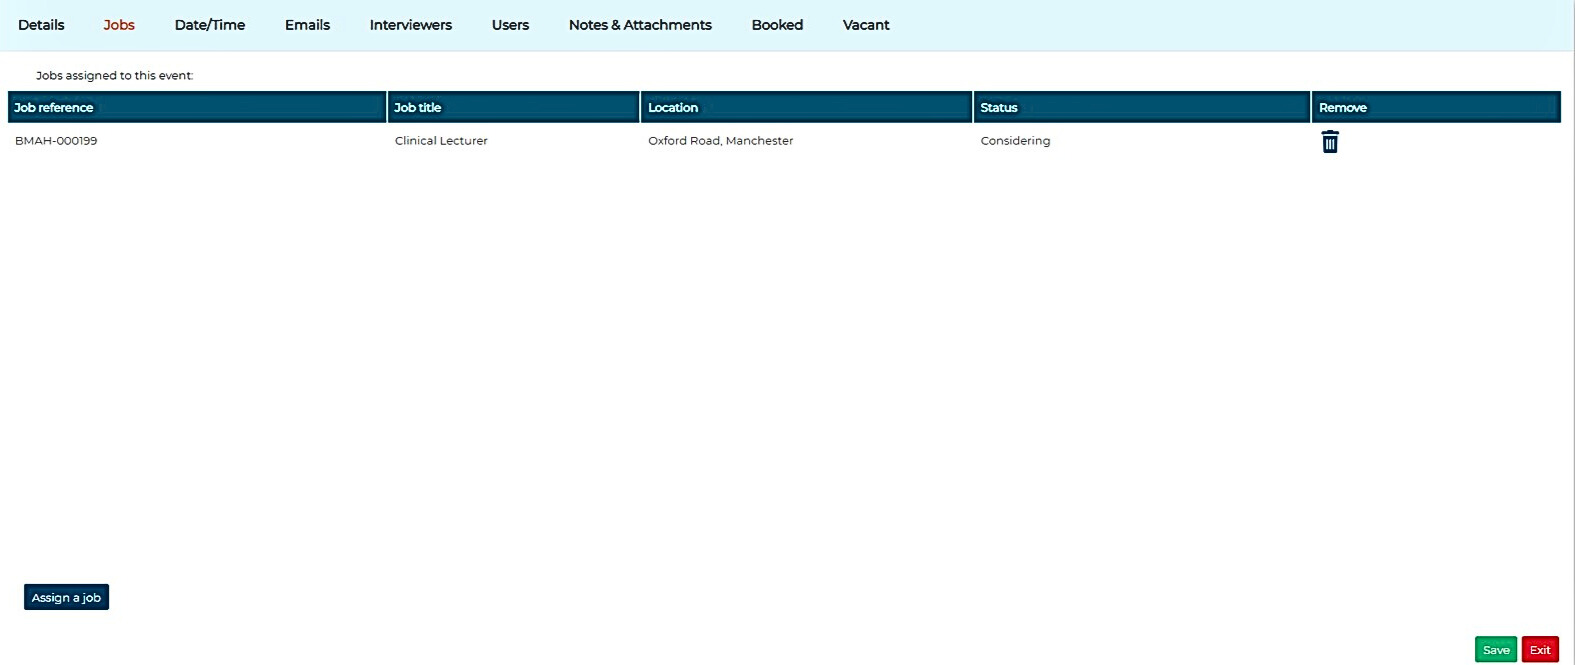
3. Jobs
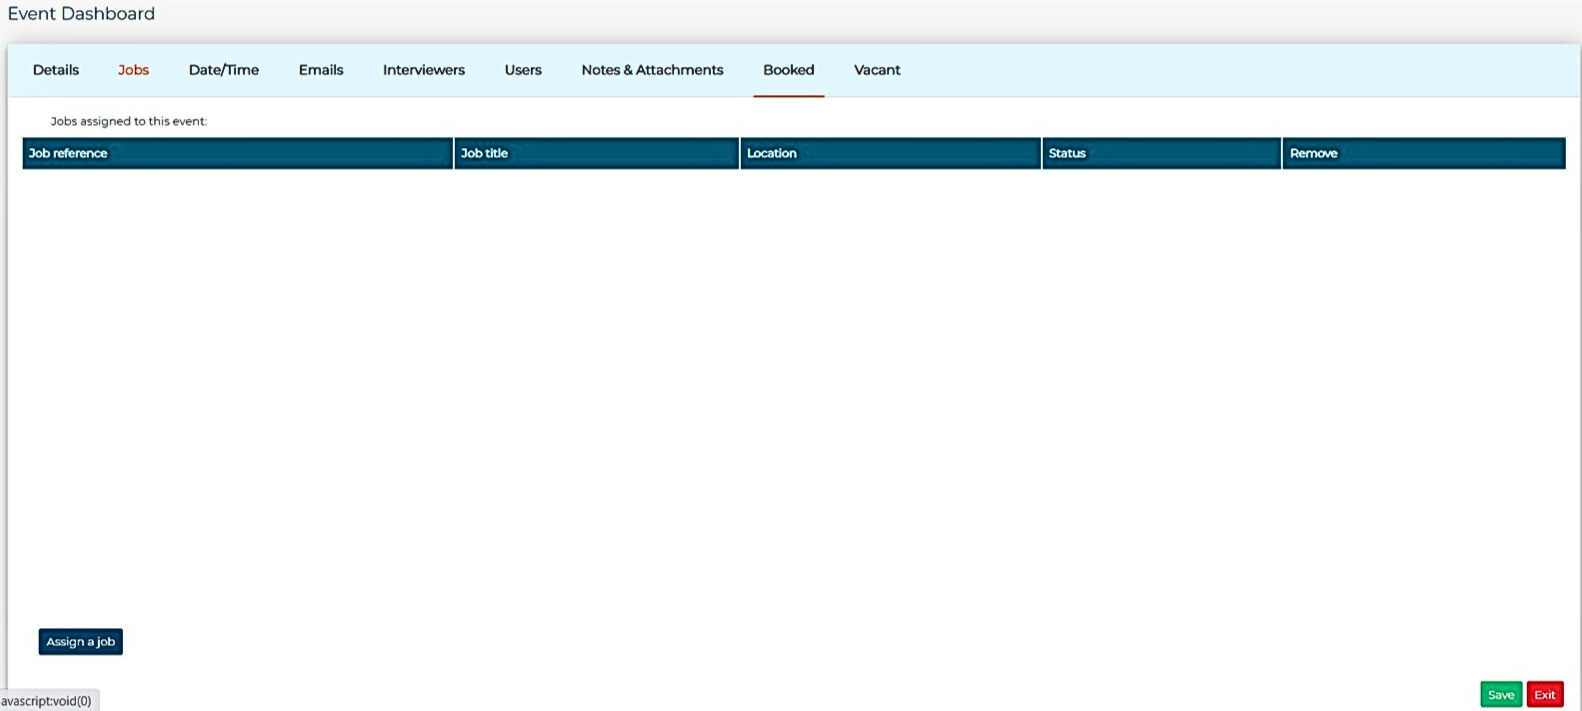
- Click Assign a Job and search for the job(s) that you would like to link to this calendar entry.
- You can search for the job by Job Title, Job reference, or Job status. Once you have located your job(s), click the appropriate tick box to select.
- Click OK.
- Your Job is now assigned, Click Save & move to the Date/Time Tab.


4. Date/Time
- Select the Date/Time tab and click Add Appointment and complete all fields outlined below & click Save.
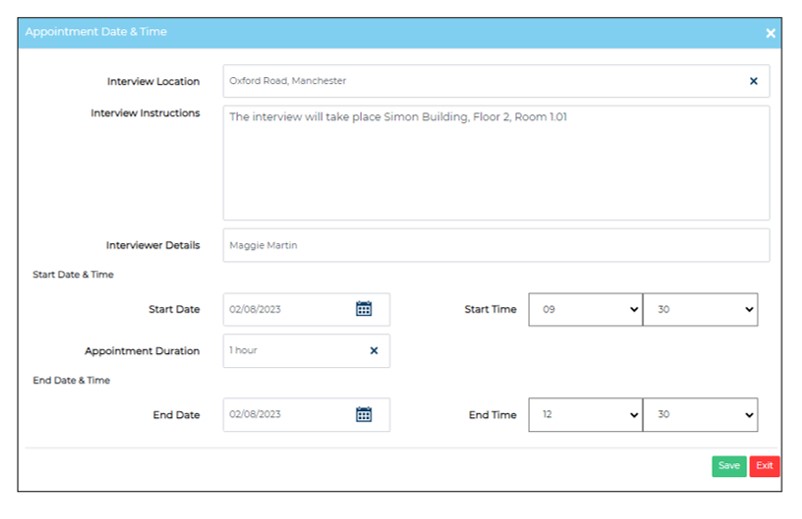
Interview Location
Choose from the list of available locations in Jobtrain (if the interview location isn't available, leave the field blank and enter the details in the Interview Instructions field instead).
Interview Instructions
You can include additional interview instructions (eg, where to go upon arrival) and links to maps. Anything added in this section will appear in the body of the confirmation email.
Interviewer Details
Enter information about the interviewer here. You must add at least one name in this section as the system auto populates this name into the confirmation email the candidate receives when they book their interview.
Start Date & Time
Enter the start date and time of your first interview of the day.
Appointment Duration
Select interview slot duration from the drop-down menu. This is how long each interview will be. Make sure you include any 'wash-up' time if required.
End Date & Time
Change the end time to the time you would like your last interview slot to finish.
Jobtrain will calculate the equivalent of one interview slot based on the start time plus, the appointment duration.

5. Including a different day into Interview Date/Time slots
If your interview is to cover more than 1 day you can do this be adding this extra day(s) into your 1 event. Do not create a new event for this.
- Create your first block of interview slots.
- Click Save
- Click the Copy icon under Action against your created appointments

- Edit the start and end date to your extra day
- Add in new start and end times
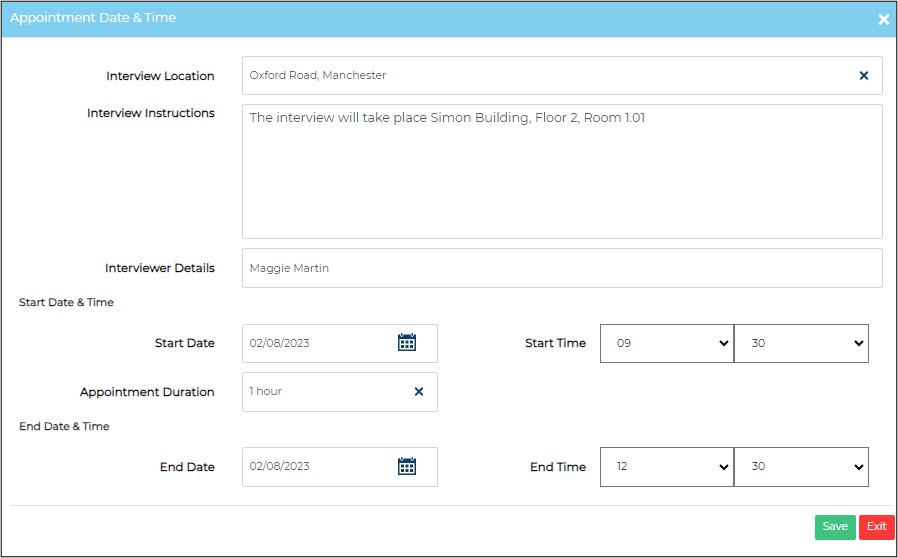
- Click Save
- You will now have one event created over two days

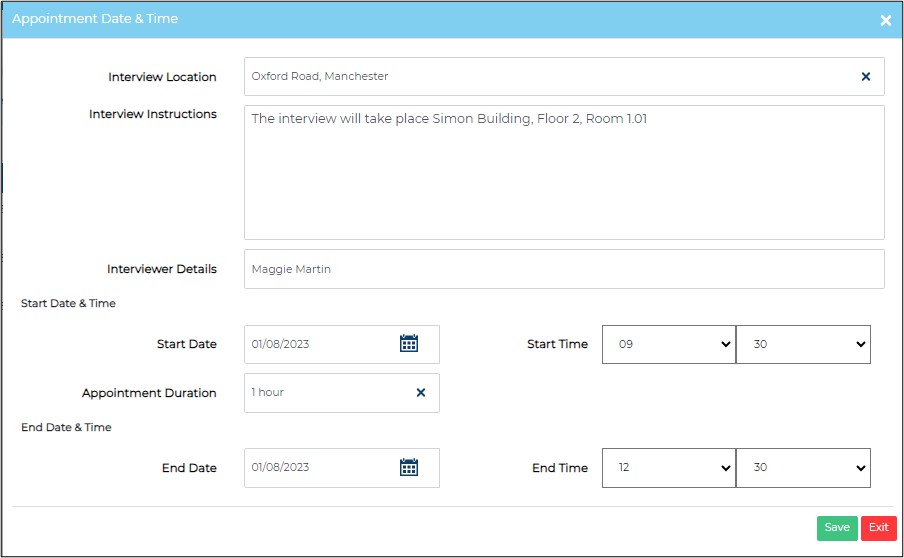
6. Including Breaks into Interview Time Slots
You can add breaks in between your interview slots. For example if your interview slots are all day and you would like to add a lunch break, you would create two appointments on the same day; one with an end time of the time you want a break and the second with a start time of the time you finish the break.
- Create your first block of interview slots.
- Click Save
- Click the Copy icon under Action against your created appointments and edit the start and end times.


7. Emails
These fields have been pre-set within the system configuration, please skip this tab and don’t amend any of the email templates.
8. Interviewers
Assign the interviewers from the Add Interviewer section and select Add to List, the selected interviewers will receive the email confirmations/cancellations.
Click Save & Continue and move to Users tab.

9. Users, Notes and Attachments
In this tab you can add any system users that you want to have visibility of the calendar event, but they will not receive details of booked and cancelled appointments email. So either add users or leave blank and click Save & Continue to move to the Notes & Attachments tab.
Notes & Attachments
- This section is where you can provide your candidates with any additional supporting information. Information regarding the interview, the plan for the day if it is more than just an interview.
- Add your notes into the Appointment Notes section. Anything added here will appear in the body of the confirmation email.
- You can add attachments to send to the candidate. You can upload documents from your computer, such as Job Description or Location Maps.
- Click Upload Document, give the document a unique name and locate the saved file on your computer to upload it. If you have added documents into Jobtrain already such as job description you can attach these from the Document Library by searching for the name of your document.
- Click Save and Continue and your calendar appointment is created.

10. Booked and Vacant sections
When candidates have been invited to and selected their interview slot, two pages will be populated, Booked and Vacant.
Booked
This page will display a list of candidates booked in for interview and details of their chosen slot.

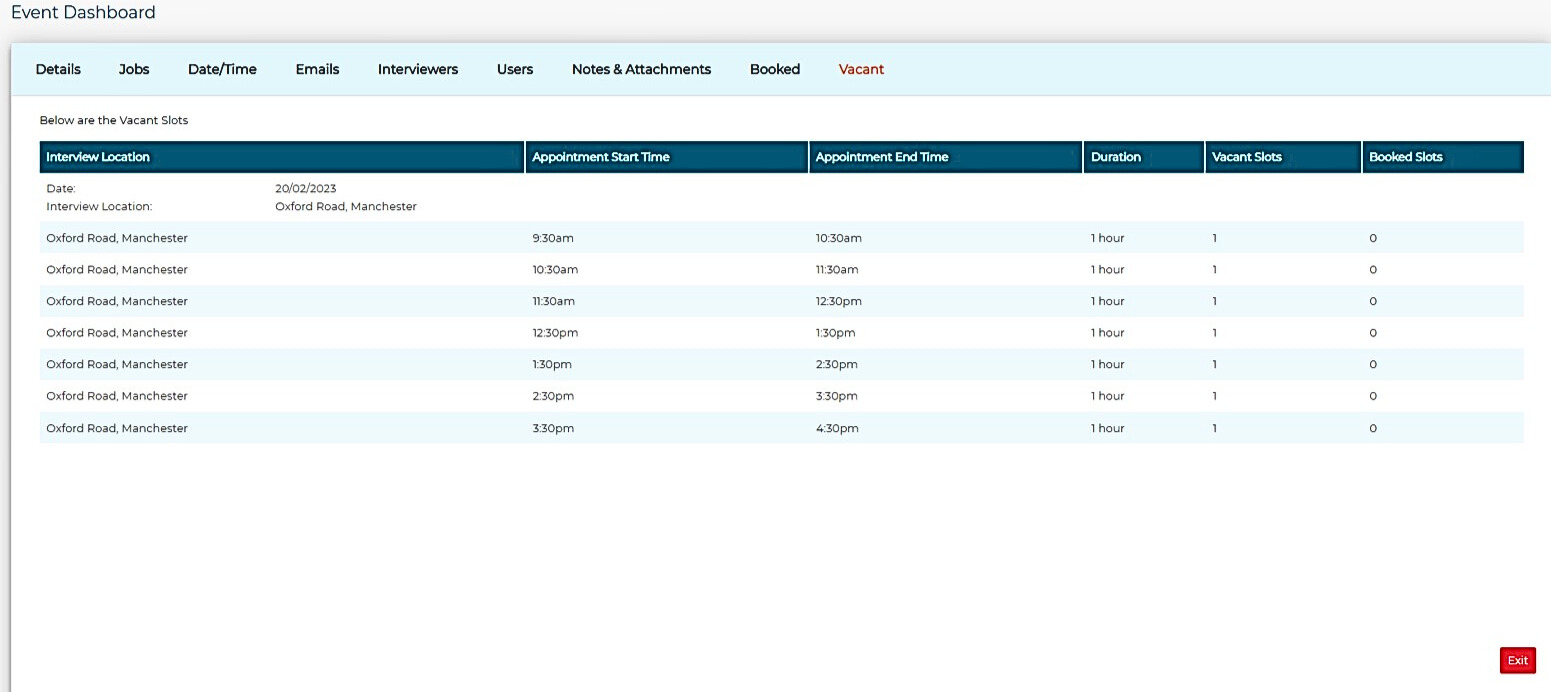
Vacant
This section displays a list of all created slots and which ones have been booked by candidates and which are still available.
- Once you have completed all and saved all tabs, click Exit to return to the Manage Events page.
- To go back to your Job, Click Search and then click the Search Jobs tile.
- Type in the job reference and then click Search.
11. Inviting candidates to book an appointment
After your calendar event has been created, the next step is to invite your candidates to book a convenient slot. To do this you need to change the status. There are two ways to change a status:
- Individually
- Change multiple candidates in one action.
Individually
- To do this, go to the job(s) you linked the calendar entry to.
- Select the candidate to invite to book their interview slot.
- Change their status to Calendar Event (candidate self-service) – Invite to book Interview (+ sends automatic email).
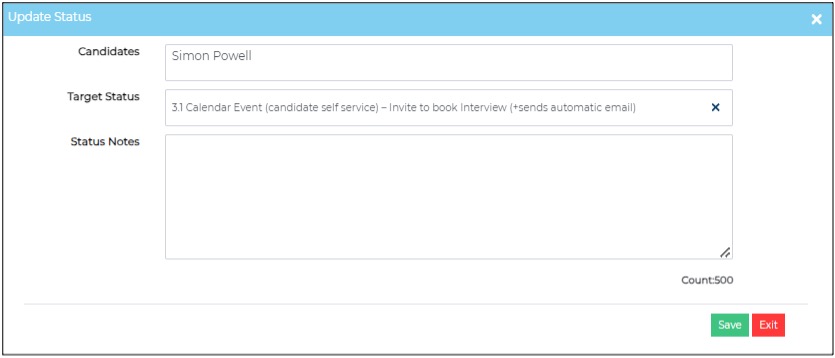
- An automatic email is now sent inviting candidates to book their interview slot (read the email).
- Upon booking their interview, the candidate will receive a confirmation email. This details the date, time of the interview and anything you added when creating the event (e.g. location, who to ask for upon arrival, info about any test) and any attachments that you added.
Multiple candidates
- You can use the Search & Filter box to search for all candidates who have the status Shortlisting, and update the status and send the email in one action.
- Change the candidate status to Shortlist and press Search, you will now see only the candidates with this status.
- Click on the box next to App Date.
- Then change the candidate status to Calendar Event (self Service) Invite to book Interview (+ sends automatic email).
- An Update Status box will appear, and you will see multiple candidate names.
- Click Save- an automatic email will be sent to all your candidates advising them that they can book their preferred interview slot.
- Candidate status will now change to Calendar Event (self-service) Invite to book interview (+ sends automatic email).
- Upon booking their interview, the candidate will receive a confirmation email. This details the date, time of the interview and anything you added when creating the event (e.g. location, who to ask for upon arrival, info about any test) and any attachments that you added.
Top tip: Remember to clear any filters once you have finished.

12. Creating a new interview date if candidates unable to attend the original day
Once you have created an event and emailed the candidates, if any candidates are unable to make those days and times and you are able to offer a new day. You need to add a new day/time into your original event. Do not create a new event.
Click into your event and click on the Date/Time tab
- Click the Copy icon under Action against your created appointments

- Edit the start and end date to your new ones
- Add in the new start and end times
Click Save
You will now have a new day and times for your candidates.
Email those that advised they couldn’t attend and ask them to relog back in via the email they first received, they will now be able to book on a new day/time.
13. Automatic Status Updates
Candidate confirms interview day & time
Once the candidate has booked their slot, their status will update to Calendar Event (candidate self-service) – Interview booked (+sends automatic email). You will receive an email to confirm their appointment.
Candidate declines the interview
Should the candidate decline the interview, if they do this via the link on the email or if you do this on their behalf, the status will automatically update to application withdrawn, the interview cancelled, and the interviewers will receive an email notification.
Booking on behalf of a candidate
Appointments can also be booked on behalf of candidates should the need arise.
- Go into the job(s) the calendar entry is linked to
- Select the calendar icon next to the candidate’s name that you wish to book on behalf of.
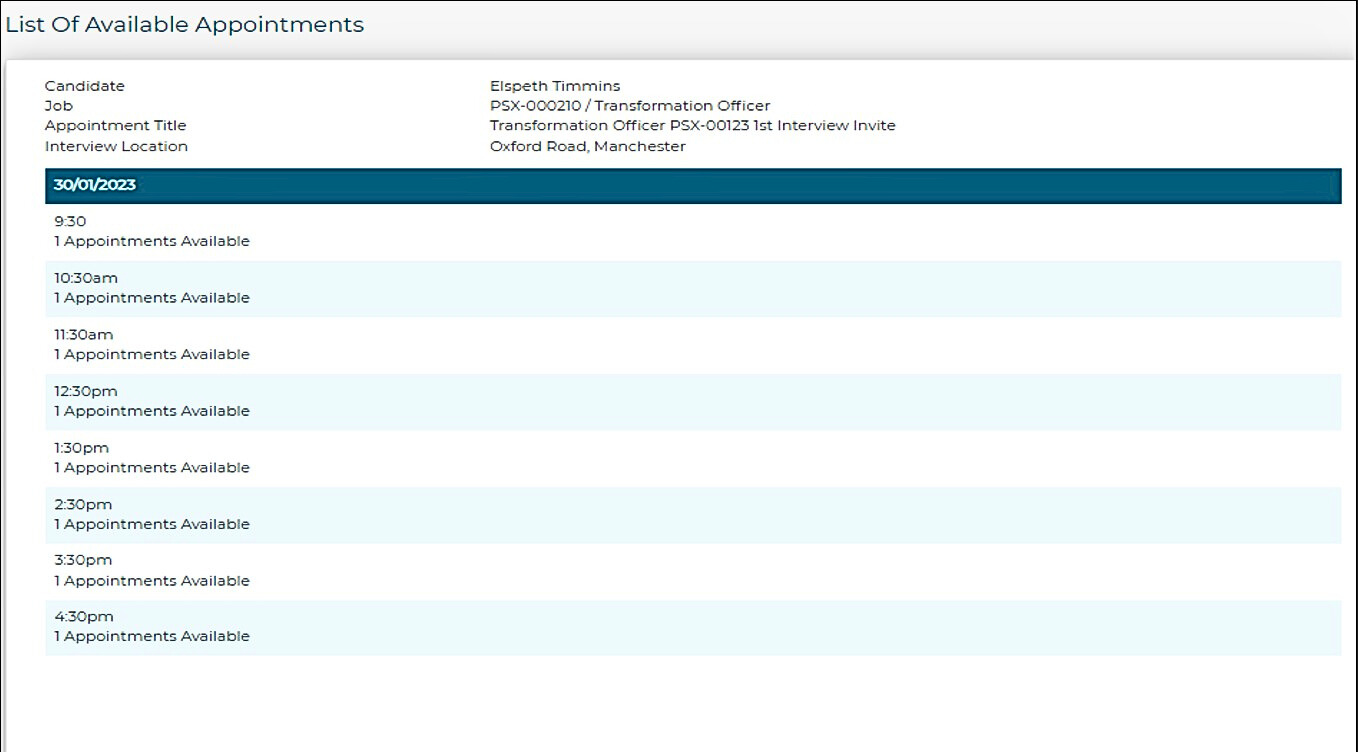
- Choose List Available Appointments.
- You will then be presented with a list of events. Select the available appointments and select Next.
- You will see a list of available appointment times, select the required time.
- Select Confirm Appointment.
- The Appointment Confirmed box will appear.
- You have now booked a slot on behalf of the candidate - they will receive a confirmation email.


14. Cancelling candidate interviews
On behalf of a candidate from candidate record or candidate list
- Click into the candidate record. Select the candidate and select the Interview time/date.
- The details tab will open, click cancel appointment.
- To cancel on behalf of a candidate, from the candidate list. Select the candidate and select the Calendar icon.
- Click Cancel Appointment.
- A confirmation box will appear, click Cancel Appointment.
- The appointment will be deleted.
- The candidate can now go back into the available slots and select a new time if they wish.


By a Hiring Manager
- This can only be done if none of your candidates have booked their interview slots. If they have then you will need to cancel each slot first. See how to cancel on behalf of a candidate above.
- Click on the Calendar Icon to show all the events you’ve created and click on the event you wish to cancel.
- Click into the Date/Time tab and click in the remove Icon in the Action Field.
A pop-up will appear asking ‘Do you want to Delete?’. Click Yes and Save & Continue. The Time slots have now been cancelled and you can go back into the Date/Time Tab to add in new ones should you wish to do so.
By a candidate
Candidates can log into the link they have received on the email and cancel their interview, you will receive notification when they do this.
Send candidate applications to panel members
In preparation for interviews, you can email shortlisted applications and other relevant candidate information direct to panel members from Jobtrain.
